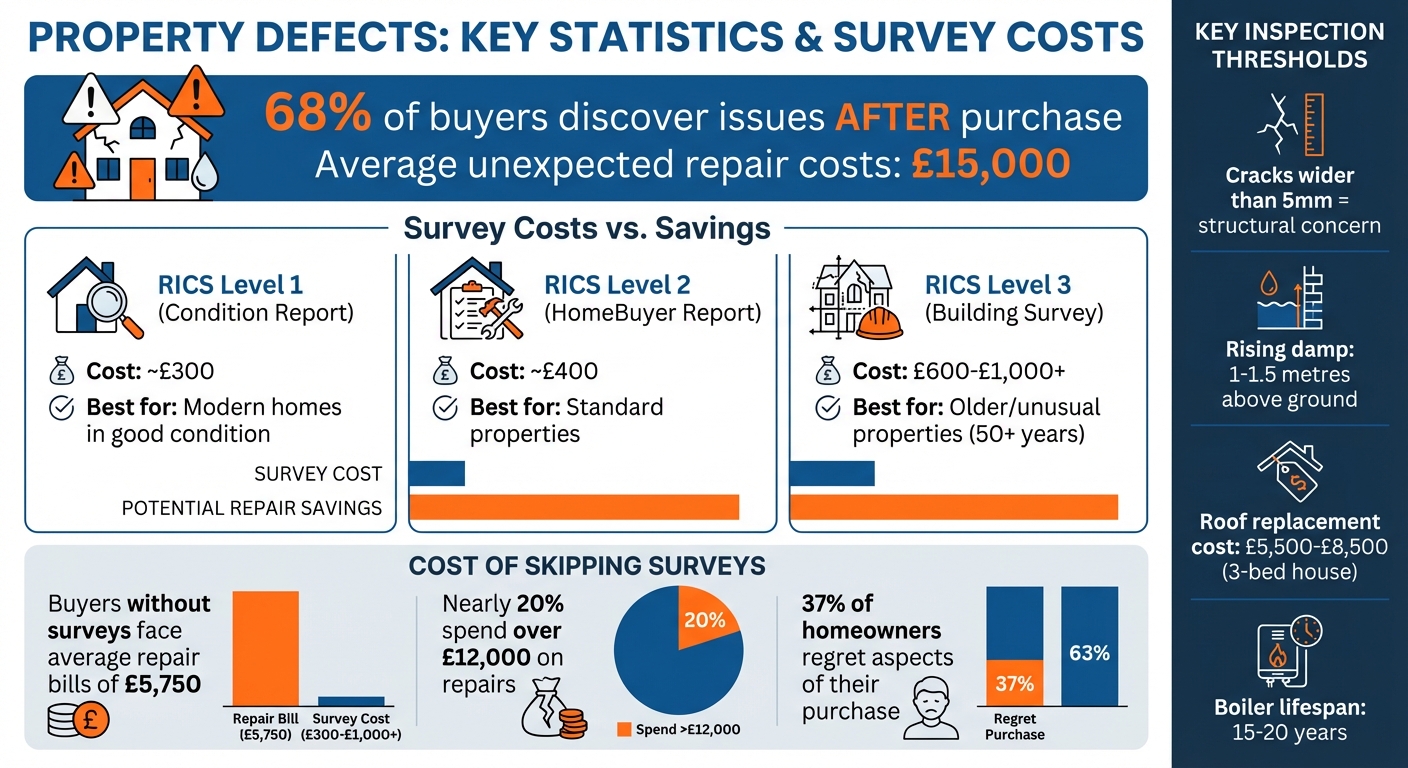
When buying a property, hidden defects can lead to unexpected repair costs averaging £15,000. 68% of buyers discover issues only after the purchase, but many problems can be identified early with proper checks. Here’s what you need to know:
- Exterior issues: Check for sagging roofs, cracks in walls, blocked gutters, and leaning chimneys. These could signal structural problems or water damage.
- Interior signs: Look for damp, mould, cracks wider than 5mm, uneven floors, and sticking doors or windows. These might indicate subsidence or hidden damage.
- Systems: Test plumbing, heating, and electrics. Outdated wiring, leaks, or inefficient boilers can be costly to fix.
- Professional help: A surveyor can identify serious issues like subsidence, asbestos, or Japanese knotweed. Surveys cost £300–£1,000 but can save thousands in repairs.
Skipping these checks could leave you with unexpected bills. Combine personal inspections with professional surveys to avoid costly surprises and negotiate a fair price.
Property Defect Statistics and Survey Costs Guide
Why you need a building survey before buying ANY property
sbb-itb-b9291f4
Checking the Property Exterior
The outside of a property can reveal a lot about its overall condition. Take a step back and view the building from every angle – issues often lurk on sides that aren’t immediately visible. A sagging roofline or outward-bowing walls can signal serious structural concerns. From there, focus on key exterior features to spot any hidden problems.
Roof and Chimney Inspection
Binoculars can help you spot cracked, loose, or missing roof tiles. Pay close attention to the ridge (the topmost part of the roof) and valleys where slopes meet, as these areas are prone to damage. If you notice flaking cement on gable end tiles, it’s a sign water is seeping in. Keep in mind that fixing such issues can be costly – replacing the roof of an average 3-bedroom house could set you back £5,500 to £8,500.
Check if the chimney stack is standing straight. A leaning chimney is a serious structural issue. Inspect the “crown” – the topmost part of the chimney – for cracks, as this area is exposed to the elements. Torn or loose lead flashing where the chimney meets the roof is another common problem and a major cause of penetrating damp. If you can access the loft during the day, look for spots of light peeking through; this could mean missing tiles or damaged flashing.
Different roofing materials have varying lifespans: slate can last anywhere from 50 to 150 years, while asphalt shingles may only last 10 to 25 years.
Gutters, Downspouts, and Drainage
Weeds or moss growing in gutters are a tell-tale sign of blockages and poor upkeep. Gutters should run in a straight line with a slight slope towards the downpipe. If they sag or dip, water will pool instead of draining properly.
Dark streaks, green algae, or moss on the walls often indicate leaking gutters. Pay attention to the joints where gutter sections meet, as these are common leakage points. You can also tap on downpipes – if they sound hollow, they’re clear, but a dull sound suggests debris.
“Leaking gutters can often cause dampness problems. Furthermore, this is sometimes wrongly diagnosed as rising damp and a large inappropriate repair bill follows – although just replacing the gutters would have solved the problem.” – Domestic Surveys
Check where downpipes discharge water. They should connect directly to drains rather than splash onto the ground near the foundation, as this can lead to damp issues, particularly around bay windows.
Walls, Windows, and Doors
Diagonal or “stair-step” cracks in brickwork are serious red flags. While hairline cracks under 3mm often result from plaster shrinkage, cracks exceeding 5mm may require a structural engineer’s assessment. Pay close attention to areas where extensions meet the original building and around bay windows, as these spots are prone to problems.
“If you can easily push your finger into wooden window frames, they are usually rotten.” – Angela Kerr, Director and Editor, HomeOwners Alliance
Check wooden window frames and sills with a simple finger test. If the wood feels soft or your finger sinks in, it’s likely rotten and needs replacing. Look for condensation or misting between double-glazed panes, as this indicates failed seals. Open and close every window and door to check for sticking or uneven gaps, which can point to structural movement. Also, inspect the mortar between bricks for gaps that could allow water to seep in.
Checking the Property Interior
After inspecting the exterior, it’s time to head inside. Internal checks can uncover problems that might not be visible from the outside, such as hidden damp or structural issues. By examining each room thoroughly, you can get a clearer picture of the property’s overall condition, complementing what you’ve already observed outside.
Finding Damp and Mould
Damp is a frequent and potentially expensive issue. It can show up as discoloured or peeling surfaces, crumbling plaster, or even a persistent musty smell – often likened to damp soil or blocked drains. Even if there are no visible signs, that odour can be a giveaway.
Mould, on the other hand, comes in various colours and forms. It tends to appear around window frames, external walls, corners, or in poorly ventilated areas like behind large furniture, inside wardrobes, or under sinks.
“If any part of your home is not dry to the touch, has mould growth or has a musty smell, you should investigate.” – RICS
Different types of damp leave different traces:
- Rising damp: Usually limited to 1 to 1.5 metres above ground level, it often creates a white, salty “tide mark” along walls or causes skirting boards to rot or pull away. Older properties (pre-1875) are especially vulnerable, as damp-proof courses weren’t yet standard.
- Penetrating damp: This can appear at any height and is often seen as damp patches that worsen during rain or as watermarks on ceilings.
- Condensation: Commonly found in bathrooms, it can lead to water droplets on windows and black mould spots.
Be cautious if a room has been freshly painted – it may be an attempt to mask damp or mould. Touch walls and surfaces; if they feel cold or damp, investigate further. Spongy floorboards can also indicate timber rot caused by moisture.
Walls, Floors, and Ceilings
Beyond damp, the property’s structural elements need careful scrutiny.
Diagonal or stair-step cracks in walls may signal subsidence, particularly if they exceed 5 mm in width. Cracks around bay windows or where extensions join the main building are also red flags. Bulging walls, uneven floors, or sagging ceilings could point to foundation issues or wall tie failures.
As you walk through the property, pay attention to sloping floors, which can hint at subsidence or foundation problems. “Bouncy” floors may indicate other structural weaknesses. Lift rugs or mats to check for woodworm holes.
Inspect ceilings for sagging or staining, which could indicate water leaks or damaged pipes. In properties with open-plan layouts, check both the ceiling and the floor above for signs of movement or cracks, as these might suggest an improperly installed support beam.
Test all internal doors and windows. If they stick, jam, or have uneven gaps around the frames, it might indicate building movement or subsidence. Move curtains and furniture aside to check for hidden cracks, damp patches, or recent attempts to cover up defects.
Fixtures and Fittings
Fixtures and fittings are just as important to inspect. Run taps to check water pressure, drainage, and for any leaks under sinks.
In bathrooms, look closely at the grouting and sealant around baths and showers. Peeling sealant or black mould could suggest water ingress. Ensure the toilet is stable – it shouldn’t wobble – and that it flushes and refills properly.
In the kitchen, test all cupboards, drawers, and built-in appliances to make sure they operate smoothly. Confirm that exhaust fans vent to the outside.
Examine electrical sockets and switches for any damage or burn marks, and ensure light fittings are functional with no exposed wiring. Check that smoke and carbon monoxide detectors are installed, properly placed, and in working order – these are essential safety features.
Finally, ask the seller or agent which fixtures and fittings are included in the sale. For new build show homes, make sure to clarify whether the high-end fixtures on display come as standard or are optional upgrades at an extra cost.
Checking Electrical, Plumbing, and Heating Systems
These essential systems can be costly to repair or replace, so it’s important to inspect them thoroughly. While some issues might not be obvious at first glance, a few straightforward checks can help identify potential problems before you make a commitment.
Electrical Systems
Electrical issues can quickly become expensive, so start by examining the fuse box and wiring. If you see a unit with a wooden back, cast iron switches, or a jumble of multiple boxes, it’s likely outdated and potentially unsafe. Modern systems should have circuit breakers with “button press trip” switches, indicating they were installed with safety standards in mind.
Older homes often have tell-tale signs of outdated wiring, such as round pin sockets, braided flex from ceiling roses, switches mounted in skirting boards, or cables with black rubber, lead, or fabric coatings. Burn marks on sockets or plugs are also clear warnings of overheating or faulty wiring.
Check the number of power points in each room. Many older properties don’t have enough sockets to meet the demands of modern appliances. In bathrooms, look for wall-mounted light switches – these are no longer compliant with safety standards, which now require pull-cord switches or external switches to minimise moisture-related risks. Test light switches and note any flickering or non-working lights, as these can point to wiring issues.
Ask the seller for documents such as the Electrical Installation Condition Report (EICR), a Building Regulations Compliance Certificate (Part P), or a Minor Works Electrical Certificate. By 2025, landlords in England will be required to have electrical installations inspected every five years by a qualified professional.
Once you’ve checked the electrics, move on to the plumbing.
Plumbing Systems
Look closely for any signs of damp or leaks. Check walls, floors, and carpets for damp patches, mould, peeling wallpaper, flaky plaster, or rust on pipes and radiators. Be alert to musty smells, which can signal hidden damp, and listen for the sound of running water when taps are off.
Test the water pressure by running multiple taps at once and note how long it takes for hot water to flow. Flush toilets to check for leaks and observe how quickly the cistern refills. Around baths, showers, and sinks, inspect the seals and mastic for cracks or gaps, as these are common sources of water ingress.
If the property has a water meter, you can perform a simple leak test. Turn off all taps and appliances, wait about 30 minutes to allow any tanks to fill, then take a meter reading. Check it again after two hours – if the reading has gone up, there may be a leak. Outside, look for dark patches on brickwork or unusually lush or dead areas in the garden, which could indicate a leaking underground pipe.
“Discovering a hidden water leak in your home can be frustrating and costly if left unresolved.” – WaterSafe
Once you’ve assessed the plumbing, turn your attention to the heating and ventilation systems.
Heating and Ventilation Systems
Ask the seller to turn on the heating and check each radiator for even heat distribution and quick warm-up. Look for rust, leaks, or cold spots at the top of radiators, as these can indicate inefficiencies or trapped air.
Find out the boiler’s age and service history. Most boilers last 15–20 years, so if the unit is nearing the end of its lifespan, you could face significant replacement costs. Request the latest Gas Safety Record, boiler service receipts, and any warranties for recently installed components. Gas appliances should be inspected annually by a Gas Safe registered engineer. Additionally, ensure the property has carbon monoxide alarms in any room with a gas boiler or wood-burning stove.
Test extractor fans in kitchens and bathrooms to make sure they’re working efficiently to remove moisture. Persistent condensation on windows or between double-glazing panes could point to poor ventilation or damaged seals. Inspect visible pipework for proper insulation and check for green verdigris on copper pipes, which could signal slow leaks over time.
Finally, review the property’s Energy Performance Certificate (EPC) rating. Homes with an E, F, or G rating typically have higher energy costs and poor insulation. A thorough inspection of these systems can help you avoid unexpected expenses and spot potential issues before buying.
When to Hire a Professional Surveyor
Some property issues are easy to spot, but others require a trained eye to assess properly. Knowing when to call in a professional surveyor can save you from costly surprises and help you make informed decisions before buying a property. Here are the key situations where expert advice is crucial.
Problems That Need Professional Inspection
Certain red flags should prompt you to seek professional help. For example, large or worsening cracks in walls – especially near extensions – uneven floors, bowing external walls, or doors and windows that won’t shut properly may point to subsidence or foundation problems. Similarly, signs like musty odours, tide marks on walls, peeling wallpaper, or crumbling plaster could indicate rising or penetrating damp that needs expert evaluation.
Roof issues, such as sagging rooflines, missing tiles, or damaged guttering, can lead to serious water damage and structural issues. If the property was built before 2000, there’s also a chance it contains asbestos, which requires a professional inspection. Spotting Japanese knotweed – a plant with bamboo-like stems and heart-shaped leaves – should also prompt you to consult a surveyor. This invasive species can damage foundations and even affect your ability to secure a mortgage.
Older homes (over 50 years), listed buildings, properties with unusual construction (like timber frames or thatched roofs), homes requiring significant renovations, or those with outdated utilities such as lead piping or old fuse boxes should always be surveyed by a professional.
What a Professional Survey Provides
Once potential issues are identified, a professional survey offers a detailed assessment of the property’s condition. While you might notice some problems yourself, more complex issues require a qualified surveyor’s expertise. Surveyors accredited by the Royal Institution of Chartered Surveyors (RICS) use tools like moisture meters, drones for roof inspections, and CCTV for drainage checks. They may also inspect roof spaces, lift floorboards, and check drainage systems to provide a thorough report.
“A house survey provides an expert account of the property’s condition, and highlights any problems in a clear and easy-to-understand way.” – RICS
Surveyors can differentiate between types of damp, helping you avoid unnecessary treatments, and they can uncover hidden hazards like asbestos. Reports are typically delivered within five days for simpler surveys and up to 10 days for more detailed inspections. If repairs are estimated to cost, for instance, £10,000, this can be used to negotiate a lower price or request that the seller addresses the issues before contracts are exchanged.
| Survey Type | Cost | Best For |
|---|---|---|
| RICS Level 1 (Condition Report) | ~£300 | Modern, conventional homes in good condition |
| RICS Level 2 (HomeBuyer Report) | ~£400 | Standard properties, with repair advice |
| RICS Level 3 (Building Survey) | £600–£1,000+ | Older (over 50 years), run-down, or unusual properties |
Make sure your surveyor is a member of either RICS or the Residential Property Surveyors Association (RPSA).
Inspections for New Build Properties
Even new build homes, which may appear flawless, benefit from a professional snagging survey. These surveys, costing between £300 and £600, identify defects before you move in.
“A snagging survey identifies cosmetic issues such as uneven plaster, crooked tiles or sticking windows. Some surveyors may provide a more detailed report that will consider structural or construction problems.” – Sam Wilson, Personal Finance Expert, Which?
It’s best to commission this survey before moving in, giving the builder a chance to address any issues under the property’s warranty or end-of-defects period. For modern, conventional new builds in good condition, an RICS Level 1 survey is often sufficient to flag urgent concerns.
Conclusion
Combining simple checks with expert surveys is a smart way to avoid expensive surprises and make well-informed choices when buying a property.
Main Inspection Points to Remember
Start your inspection from the outside and work your way in. Look for slipped roof tiles and ensure gutters and downpipes are directing water away from the property. Pay attention to walls – cracks wider than 5 mm could signal structural concerns that may require a structural engineer’s evaluation.
Inside the property, look for signs of hidden damp, such as musty smells, soft or spongy floorboards, and issues with taps or heating systems. Outdated systems like old fuse boards, boilers, or plumbing can lead to hefty replacement costs.
It’s worth noting that 37% of homeowners regret aspects of their purchase. Buyers who skip a professional survey often face unexpected repair bills averaging £5,750, with nearly 20% spending over £12,000 to make their home liveable. These numbers highlight how thorough inspections can give you the upper hand in negotiating repairs or adjusting the purchase price before contracts are finalised.
While these checks are crucial, a professional survey can uncover issues that might go unnoticed.
Why Professional Guidance Helps
A qualified surveyor brings specialist tools like moisture meters and drones, allowing them to differentiate between minor hairline cracks and more serious structural problems. They can access hidden areas, such as lofts and under-floor spaces, and provide an impartial evaluation using a traffic light system (Condition Ratings 1–3) to prioritise necessary repairs.
“Just because a survey is optional, doesn’t mean you shouldn’t have one. They can save you time and money by highlighting what might need repairing.” – Propertymark
Professional surveys can also protect you from buying a property that might be unmortgageable. Issues like spray foam insulation or certain cavity wall treatments could significantly lower a home’s value. With 60% of consumers stating that the most important traits in a property professional are holding a regulated qualification and belonging to a professional body, choosing an experienced surveyor ensures you have all the information needed to make a confident decision.
FAQs
What hidden property defects should I watch out for before buying?
When you’re viewing a property, it’s crucial to keep an eye out for hidden problems that could lead to expensive repairs down the line. For instance, roof issues, such as cracked tiles or damaged flashing, can let water seep in, potentially causing significant damage over time. Also, watch for signs of damp and mould – these often show up as discoloured walls, peeling paint, or even a lingering musty smell.
Pay attention to structural concerns, like cracks in the walls or sloping floors, as these might hint at deeper, more serious problems. In older homes, be cautious of timber rot or woodworm infestations, which can compromise the integrity of the property. Don’t forget to assess the state of vital systems, including the wiring, plumbing, and boiler. Outdated or poorly installed systems can be pricey to replace and inconvenient to live with.
If anything raises a red flag, it’s a good idea to consult a qualified surveyor. Their expertise can provide peace of mind and ensure you have all the facts before making a decision.
How can a surveyor help identify property defects before you buy?
A qualified, RICS-registered surveyor provides an impartial and professional evaluation of a property’s condition, giving you peace of mind before making a purchase. Depending on what you require, they can carry out a comprehensive Building Survey or a more straightforward HomeBuyer Report. Both options are designed to pinpoint potential issues, estimate repair costs, and flag any safety or legal concerns.
During the inspection, the surveyor carefully assesses key aspects of the property, including the roof, walls, floors, and insulation. They look for common problems such as damp, structural cracks, rot, or warped timbers. In some cases, advanced tools like drones or pole cameras are used to examine areas that are difficult to access. By uncovering issues early, a survey can help you avoid surprise repair bills, negotiate a better price, or ensure essential repairs are addressed before finalising the deal.
What could it cost if I skip a property inspection or survey?
Skipping a property inspection or survey might seem like a way to save money upfront, but it can backfire in a big way. On average, homebuyers who skip this step end up facing repair costs of about £5,750 – and in some cases, these expenses can soar past £12,000 just to make the property habitable.
By opting for a professional survey, you can uncover hidden problems early on. This not only helps you avoid unexpected expenses but also ensures you’re making a well-informed choice before committing to such a significant purchase.