{"cover":"Professional landscape format (1536×1024) hero image with bold text overlay: 'Thermal Imaging & Moisture Detection in Building Surveys' in extra large 72pt white bold sans-serif font with dark semi-transparent gradient overlay box, centered upper-third composition. Background shows a dramatic split-screen: left side shows a conventional photograph of a brick wall with no visible damp, right side shows the same wall rendered in vivid thermal infrared palette (blues, greens, yellows, reds) revealing hidden moisture patterns glowing orange-red. Professional surveyor in hard hat holds a thermal imaging camera. Color scheme: deep navy blue, thermal orange-red, white text. Magazine cover aesthetic, editorial quality, high contrast.","content":["Detailed landscape format (1536×1024) illustration showing a cutaway cross-section diagram of a UK residential brick cavity wall with hidden moisture zones highlighted in thermal infrared false-color palette (deep blue to bright orange gradient). A professional building surveyor in PPE holds a FLIR-style thermal camera aimed at the wall. Overlaid data annotations show temperature readings: interior 21°C, exterior 3°C, moisture zone 8°C cold spot. Small inset panel shows a moisture meter confirming readings. Background: modern UK terraced house interior. Clean technical infographic style, professional surveying context.","Detailed landscape format (1536×1024) top-down aerial perspective showing a flat commercial roof being scanned by a thermal drone at dusk. The drone's thermal camera feed is displayed on a tablet held by a surveyor below, showing wet insulation zones glowing in warm orange-yellow against a cool blue-purple background representing dry roof sections. Annotations label: 'wet insulation detected', 'moisture spread zone', 'thermal bridge'. Dramatic twilight sky, urban rooftop setting, technical data overlays, professional construction survey aesthetic, high detail.","Detailed landscape format (1536×1024) showing a structured comparison panel: left panel displays a standard visible-light photograph of a pristine-looking interior wall with fresh paint and no obvious defects; right panel shows the identical wall in thermal infrared imaging revealing a dramatic cold blue moisture intrusion pattern spreading from a concealed pipe leak behind the plasterboard. Center dividing line labeled 'Visual Inspection vs Thermal Imaging'. Bottom strip shows a 7-item checklist of detectable issues with thermal icons. Clean, professional infographic style, white background accents, authoritative building survey context."]
Roughly 1 in 5 UK homes contains some form of dampness — yet the majority of those cases are invisible to the naked eye during a standard property inspection. The wall looks fine. The ceiling appears dry. The paint is intact. But behind the plasterboard, inside the cavity, or beneath the flat roof membrane, moisture is silently destroying insulation, corroding structural timbers, and creating conditions for mould growth. Thermal imaging and moisture detection in building surveys: advanced protocols for identifying hidden damp beyond visual inspection exist precisely to close that gap — and in 2026, with Awaab's Law now extending its reach into the private rented sector, the stakes for getting this right have never been higher.

Key Takeaways
- 🌡️ Thermal cameras detect temperature anomalies, not moisture directly — a minimum 10°C (18°F) temperature differential between interior and exterior is required for reliable results.
- 💧 Active leaks appear as cool spots; trapped/stagnant moisture appears as warm spots on thermal images, enabling surveyors to distinguish between different damp conditions.
- 🏠 Seven distinct building defect categories can be identified through thermographic survey protocols, from envelope intrusion to flat roof moisture accumulation.
- 🔬 Thermal imaging must be combined with moisture meters and visual inspection — it is a detection tool, not a definitive diagnosis.
- ⚖️ Post-Awaab's Law compliance is driving rapid adoption of thermographic protocols in residential surveys, particularly in the private rental sector.
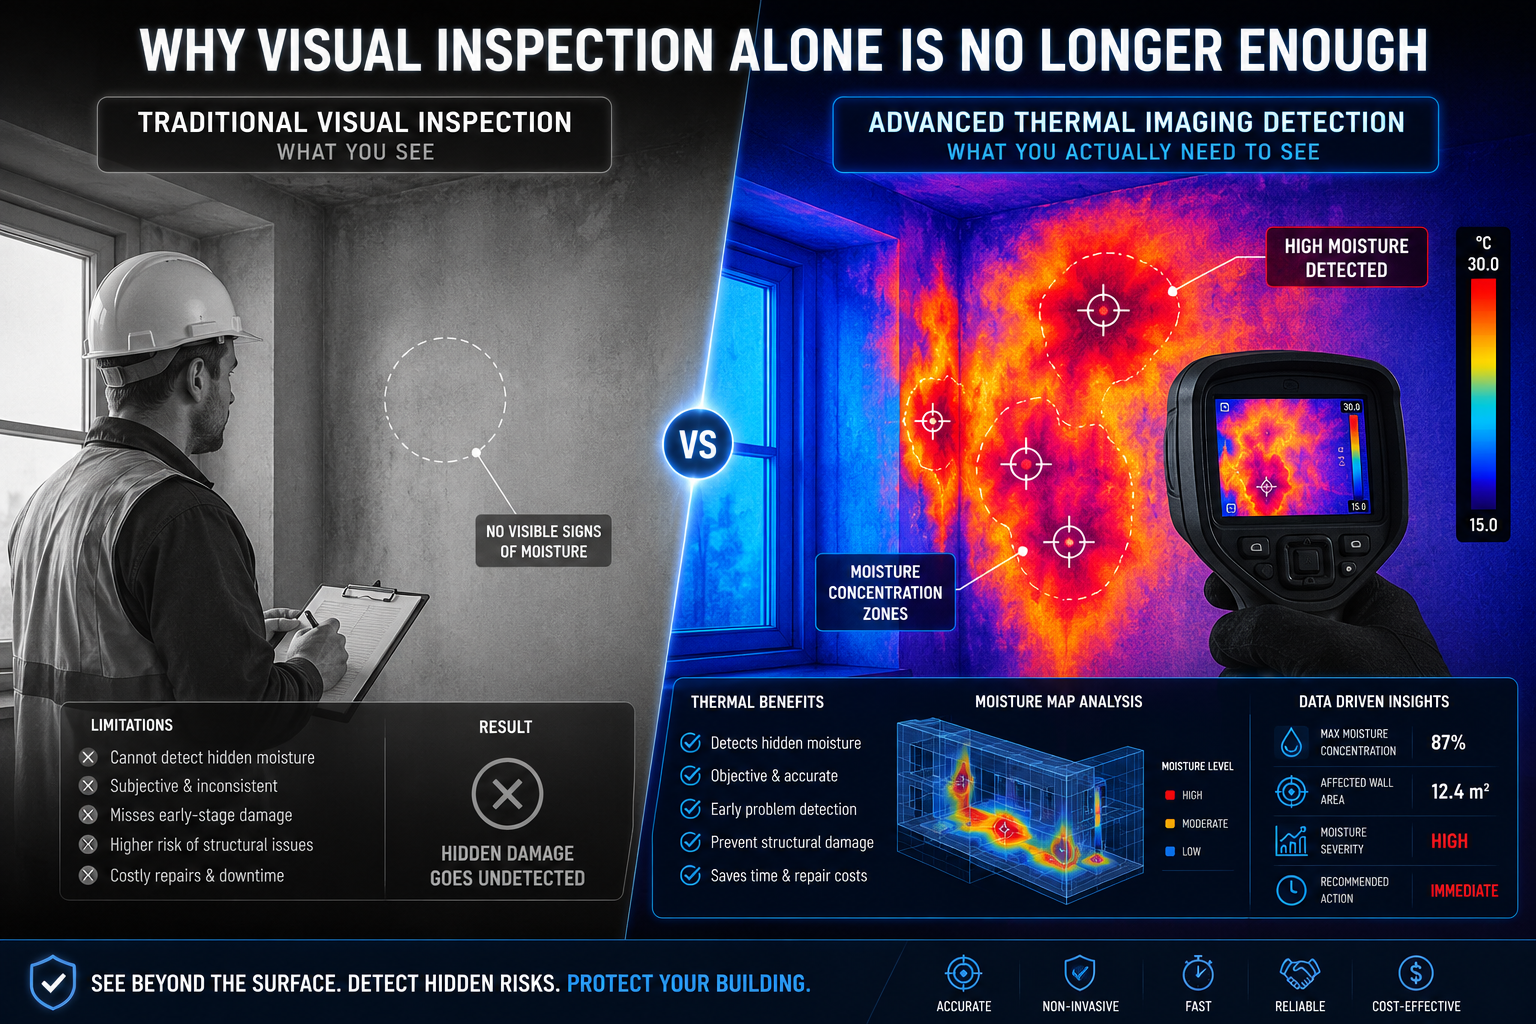
Why Visual Inspection Alone Is No Longer Enough
For decades, building surveyors relied on three tools: eyes, a probe, and experience. A damp patch on a wall, a musty smell in a hallway, or bubbling paint near a skirting board were the classic indicators of moisture ingress. The problem is that by the time any of these signs appear, the damage is often already significant — sometimes catastrophic.
Understanding what causes moisture in buildings reveals why visual detection consistently fails. Moisture travels. It enters through a hairline crack in the external render, wicks horizontally through a cavity, saturates insulation batts, and eventually reaches a structural timber — all before producing a single visible symptom on an interior surface. In older UK properties with solid brick construction, this journey can take months or years.
"The absence of visible damp is not evidence of the absence of damp."
The thermal imaging market for building diagnostics reached USD 1,044 million in 2026, reflecting how seriously the construction and surveying industries now take non-invasive detection technology [1]. This growth is not driven by novelty — it is driven by repeated failures of visual-only inspection protocols to catch moisture problems before they become structural ones.
The Awaab's Law Factor
Awaab's Law — named after two-year-old Awaab Ishak, who died in 2020 from prolonged exposure to mould in a social housing property — initially applied to social housing landlords. In 2026, its provisions are being extended progressively into the private rented sector, creating legal obligations to investigate and remediate damp and mould within defined timeframes. For landlords and surveyors alike, this means that "we couldn't see any damp" is no longer an acceptable finding. Documented, instrument-based investigation is becoming the expected standard.
How Thermal Imaging and Moisture Detection in Building Surveys Works: The Science Behind the Protocol
Thermal cameras do not see moisture. This is one of the most important — and most misunderstood — facts in thermographic surveying. What they detect is surface temperature variation. Moisture influences temperature because water has a high thermal mass and conducts heat differently from dry building materials. A wet section of insulation, for example, conducts heat significantly faster than a dry section — creating a detectable temperature signature on the surface above it [5].
Understanding the Thermal Signatures
| Condition | Thermal Appearance | Reason |
|---|---|---|
| Active water leak (pipe or roof) | Cool blue/purple spot | Evaporative cooling effect |
| Trapped/stagnant moisture | Warm orange/yellow spot | Higher thermal mass retaining heat |
| Wet insulation in roof | Warm patch against cool background | Faster heat conduction through saturated material |
| Thermal bridge (poor insulation) | Cold spot on interior surface | Heat escaping through structural weakness |
| Air infiltration zone | Cool streak or pattern | Cold external air entering building envelope |
This distinction matters enormously in practice. Water and trapped moisture appear as warm spots on thermal images, while hidden active leaks manifest as cool spots [1]. A surveyor who misreads these signatures risks misdiagnosing the source, severity, and location of a damp problem.
The 10°C Rule: Why Environmental Conditions Determine Everything
Advanced protocols now mandate a minimum 18°F (10°C) temperature differential between interior and exterior surfaces before any thermographic moisture inspection begins [1]. Without this differential, the temperature contrast between wet and dry building materials is too small to produce reliable imagery. In the UK, this means thermal surveys are most effective between October and March — the heating season — when interior spaces are actively heated and external temperatures are low.
Pre-inspection environmental data that must be recorded includes:
- ✅ Interior air temperature and relative humidity
- ✅ Exterior air temperature and wind direction
- ✅ Recent weather conditions (rain in the preceding 24–48 hours can distort readings)
- ✅ Solar loading (direct sunlight on external walls creates false thermal patterns)
- ✅ Time of day (early morning surveys avoid solar contamination)
Failure to document these conditions is a protocol failure — any anomalies detected cannot be reliably interpreted without this baseline data [1].
Advanced Protocols for Identifying Hidden Damp Beyond Visual Inspection
The most effective thermographic surveys in 2026 are multi-instrument, multi-stage processes. They are not simply a matter of pointing a camera at a wall. A Level 3 Full Building Survey that incorporates thermal imaging follows a structured methodology designed to eliminate false positives and ensure every anomaly is properly categorised.
Stage 1: Pre-Survey Visual Inspection
Before the thermal camera is switched on, a systematic visual inspection of both exterior and interior surfaces is conducted. Surveyors check for:
- Damp or stained walls and ceilings
- Peeling paint or wallpaper
- Musty or earthy odours
- Visible mould growth (particularly in corners and behind furniture)
- Warped or swollen flooring
- Crumbling plaster or drywall
- Efflorescence (white salt deposits on masonry)
- Cracks in render or pointing
These visual findings create a map of suspected problem zones that guides where thermal imaging is prioritised. They also provide correlating evidence when thermal anomalies are later detected.
Stage 2: Blower Door Testing Integration
One of the most significant advances in 2026 protocols is the routine integration of blower door testing alongside thermal imaging [1]. A blower door depressurises the building envelope, forcing air infiltration through gaps and cracks. When the thermal camera is used simultaneously, air infiltration pathways — which are strongly correlated with moisture intrusion zones — become clearly visible as temperature streaks and patterns.
This combined approach is particularly effective for identifying:
- 🏗️ Failed cavity wall ties allowing air and moisture ingress
- 🏗️ Compromised window and door frame seals
- 🏗️ Penetrations through the building envelope around pipes and cables
Stage 3: Systematic Thermographic Scanning
The thermal survey itself follows a room-by-room, surface-by-surface protocol. Surveyors scan:
Interior surfaces: All walls, ceilings, and floors — with particular attention to external walls, areas adjacent to bathrooms and kitchens, and zones beneath flat roofs.
Roof spaces: Thermographic roof scans are highly effective at detecting wet insulation, which conducts heat faster than dry insulation and produces a distinctive warm signature [5]. Advanced protocols can now map moisture spreading horizontally inside ceiling cavities — identifying the full extent of water infiltration before structural timbers are compromised [4].
Flat roofs: Infrared scanning of flat roofs is most effective after sunset, when the roof surface cools rapidly but wet insulation retains heat longer, creating clear thermal contrast. This technique reliably identifies moisture accumulation beneath membrane surfaces that would be entirely invisible from above [9].
For properties where roof access is challenging, drone-based thermal surveys provide an efficient alternative, capturing high-resolution thermographic data across large roof areas safely and quickly [7].
Stage 4: Moisture Meter Confirmation
This is the step that separates a professional thermographic survey from an amateur one. Thermal cameras detect temperature differences — they do not confirm the presence of moisture, mould, or its specific cause [4]. Every thermal anomaly flagged during scanning must be followed up with a calibrated moisture meter reading.
This two-instrument approach:
- Eliminates false positives caused by cold bridges or residual thermal patterns
- Provides quantitative moisture content data (expressed as a percentage)
- Determines whether moisture levels are within acceptable ranges or require remediation
- Creates a defensible, documented evidence trail for legal or insurance purposes
💡 Key insight: A thermal anomaly without a corresponding moisture meter reading is a hypothesis, not a finding.
The Seven Detectable Defect Categories
Current advanced protocols are designed to detect seven primary categories of building defect [1]:
- Building envelope water intrusion — rain penetration through walls, roofs, and junctions
- Exterior wall air leakage — gaps in the building envelope allowing cold air infiltration
- Missing or damaged insulation — voids and deteriorated insulation batts in walls and roofs
- HVAC equipment malfunctions — duct leaks and system failures affecting moisture control
- Electrical system overheating — a safety risk often found during moisture surveys
- Radiant heating and plumbing leaks — concealed pipe failures beneath floors and within walls
- Flat roof moisture accumulation — water trapped beneath roofing membranes
Thermal Bridging, Condensation Risk, and the Hidden Damp Connection
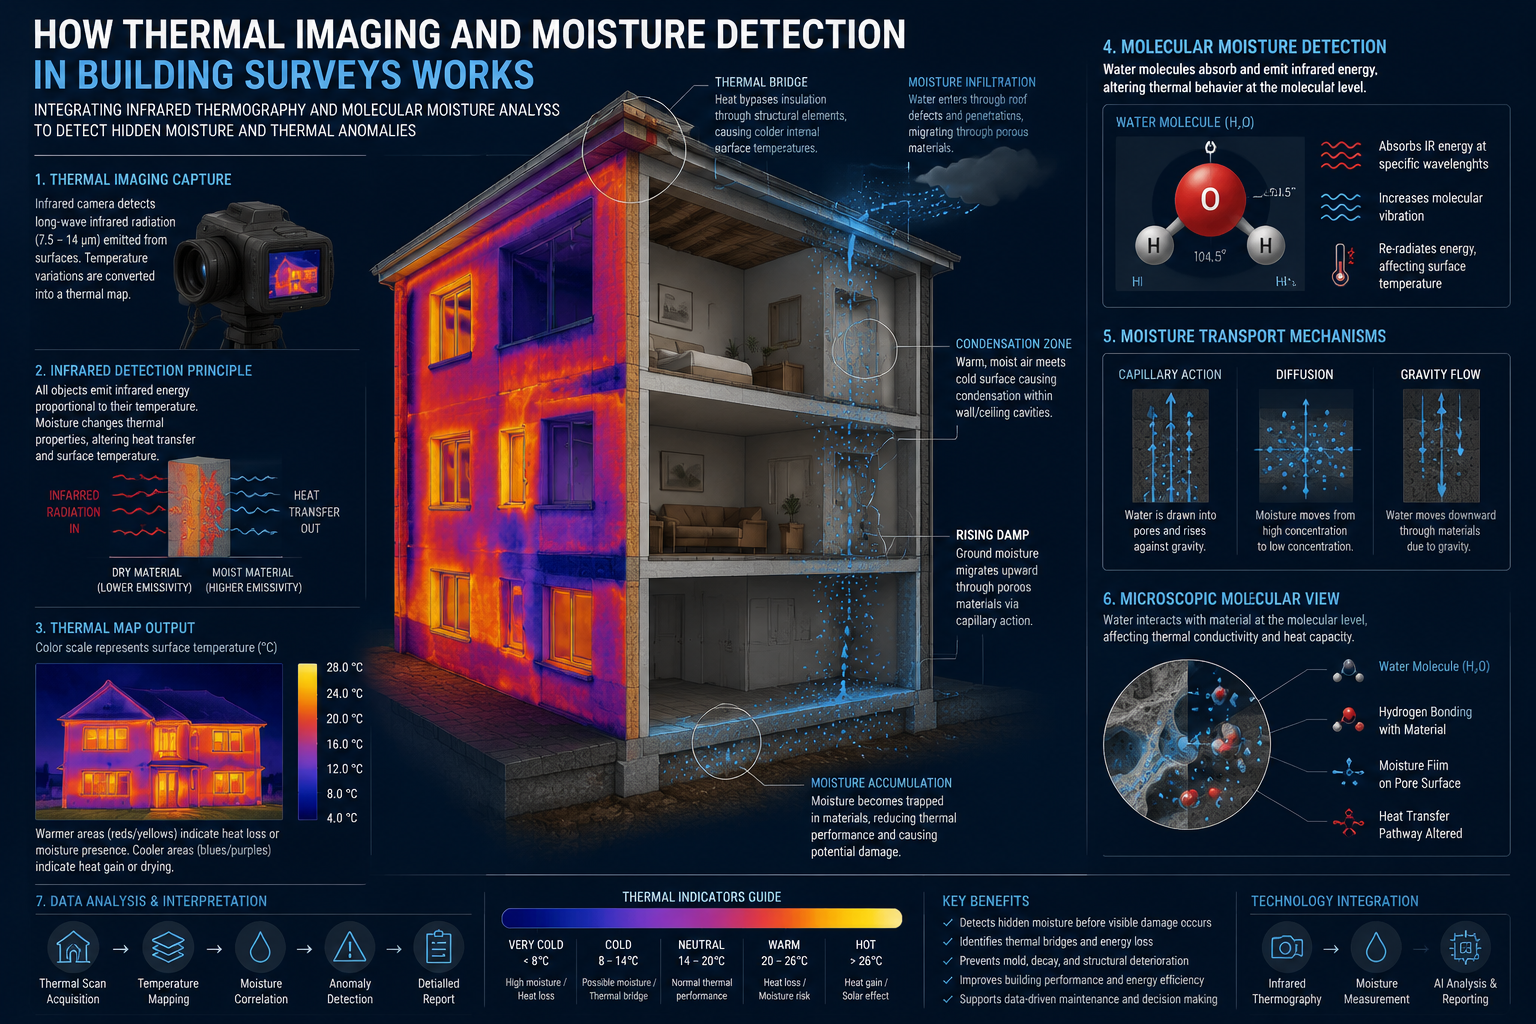
One of the most valuable — and frequently overlooked — applications of thermographic inspection is the identification of thermal bridges. A thermal bridge is a zone in the building fabric where heat escapes more readily than through surrounding areas, typically because of a structural element (a concrete lintel, a steel beam, a poorly insulated junction) that bypasses the insulation layer [2].
Thermal bridges matter for moisture detection because they create cold spots on interior surfaces. When warm, humid interior air contacts these cold surfaces, it reaches its dew point and condensation forms. Over time, this condensation saturates the surface material, creating conditions for mould growth — even in a building with no external water ingress whatsoever.
This is why many properties pass a visual damp inspection in summer but develop mould problems in winter. The thermal bridge was always there; the conditions for condensation only arise when the heating season begins.
For properties in conservation areas or listed buildings — where invasive investigation is restricted — specialist building defect surveys that incorporate thermal imaging are particularly valuable, as they provide detailed diagnostic information without requiring physical intrusion into historic fabric.
Thermal Imaging in the Context of a Full Building Survey
Thermographic inspection is most powerful when integrated into a comprehensive building survey rather than conducted as a standalone exercise. The questions that a thorough survey should address — structural integrity, material condition, defect identification, and remediation priority — are all informed by thermographic data.
Homebuyers and property investors should ask their surveyor directly what questions to raise during a building survey regarding thermal imaging capability. Not all surveyors carry thermographic equipment or hold the relevant Level 1 or Level 2 thermographic certification. Confirming this before instruction can make the difference between a survey that identifies hidden damp and one that misses it entirely.
What Thermal Imaging Cannot Do
Honesty about limitations is part of professional protocol:
- ❌ Thermal cameras cannot see through walls — they read surface temperatures only
- ❌ They cannot identify mould — only conditions where mould is likely [4]
- ❌ They cannot confirm the source of moisture without additional investigation
- ❌ Results are invalid without adequate temperature differential between inside and outside
- ❌ They cannot replace destructive investigation where moisture source confirmation is legally required
Practical Implications: What Property Owners and Buyers Should Know
Understanding how thermal imaging and moisture detection in building surveys — advanced protocols for identifying hidden damp beyond visual inspection — apply in practice helps property owners make better decisions.
For buyers: A property that has passed a standard Level 2 HomeBuyer Report but shows signs of previous damp treatment should be considered for a full thermographic survey before exchange. The cost of a thermal survey is negligible compared to the cost of undisclosed moisture damage. Understanding how to negotiate a house price after a survey is much easier when you have documented thermographic evidence of defects.
For landlords: Post-Awaab's Law, documented thermographic investigation provides a defensible record of due diligence. If a tenant reports damp or mould, commissioning a thermal survey and moisture meter assessment — and retaining the report — demonstrates that a systematic, instrument-based investigation was conducted.
For building owners: Periodic thermographic surveys (every 3–5 years, or following significant weather events) provide early warning of moisture ingress before it reaches structural timbers or insulation. Early intervention is consistently less expensive than remediation after structural damage has occurred. It is also worth noting that wood rot — one of the most costly consequences of undetected moisture — is almost entirely preventable with early thermographic detection.
Conclusion: Actionable Next Steps for 2026
The combination of Awaab's Law compliance pressure, rising damp-related insurance claims, and the maturation of affordable thermal imaging technology has made thermographic moisture detection a standard expectation rather than a premium add-on in professional building surveys.
Here is what to do now:
- Commission a Level 3 Full Building Survey that explicitly includes thermographic inspection for any property purchase, particularly those built before 1980 or with a history of damp treatment.
- Verify your surveyor's thermographic credentials — ask for confirmation of Level 1 or Level 2 thermographic certification before instruction.
- Schedule surveys in the heating season (October–March in the UK) to ensure the 10°C temperature differential required for reliable results.
- Insist on moisture meter confirmation of every thermal anomaly — do not accept a thermal image alone as evidence of damp.
- Retain all survey documentation — thermographic reports with timestamped environmental data provide the strongest possible evidence base for insurance claims, legal disputes, and price negotiations.
- For landlords, conduct proactive thermographic assessments of rental properties before tenants report problems — this is the most cost-effective approach to Awaab's Law compliance.
Thermal imaging and moisture detection in building surveys — advanced protocols for identifying hidden damp beyond visual inspection — represent the current gold standard in non-invasive property diagnostics. The technology is proven, the protocols are established, and the legal and financial case for adoption is compelling. The only question is whether your next survey will use them.
References
[1] Thermal Imaging Camera For Building Diagnostics 2026 Guide – https://aluwedo.com/thermal-imaging-camera-for-building-diagnostics-2026-guide/
[2] Thermographic Inspection – https://mfe-is.com/thermographic-inspection/
[4] Whats A Thermographic Survey And Does My Building Need One – https://www.leecompany.com/resources/whats-a-thermographic-survey-and-does-my-building-need-one/
[5] Thermographic Inspections – https://www.energy.gov/energysaver/thermographic-inspections
[7] Thermal Drones For Construction – https://www.thedroneu.com/blog/thermal-drones-for-construction/
[9] Infrared Roof Scan – https://www.irscinc.com/infrared-roof-scan/